
If you want to start a blog, but you’re not sure what to do first, the best place to start is with a plan and roadmap. You may be starting a lifestyle blog or a blog for your business. In this guide, I’ll walk you through choosing a niche, purchasing hosting and setting up your self-hosted WordPress site, so you can make your site live.
I’ve set up and started four blogs of my own. As a professional blog coach, I’ve helped many new bloggers start theirs from scratch. One thing that I know makes the process easier is knowing what to do before you launch, and what to save for afterward.
Here are the key steps we’ll go through in this post:
- Choose your niche, identify who you’re writing for, and set a launch goal
- Choose a blog name and check that the domain is available
- Compare hosting plans, purchase hosting, and set up WordPress
- Configure your WordPress settings, backups, and essential plugins
- Choose a theme and customize your blog’s fonts, colours, and layout
- Create your About, Contact, and policy pages, then organize your categories and menu
- Set up your blog email address and connect your site to Google Analytics and Search Console
- Plan a group of related posts and write and publish your first one
- Test your blog on your phone and computer
- Officially launch your blog
Want A Checklist To Follow As You Start Your Blog?
My free Launch It: Start A Blog Course & Toolkit walks you through setting up WordPress, publishing your first post, and checking that your site is ready for readers. Get the launch checklist I use in the course to help you track tasks.
Let’s start creating a blog that lasts. Our first step: who are you writing for, and what will they learn from you?

DISCLOSURE: This post contains affiliate links to products I use and recommend. I may make a small commission on any purchases you make using these links, at no extra cost to you. Read my Disclaimer for more information.
Bookmark this post for reference on Pinterest!

Teach Your AI Chatbot To Become Your Blog’s Assistant
Get this free guide that takes you through the steps of teaching Claude, ChatGPT and Gemini about your blog, your goals and your blog’s unique brand voice. Have your chatbot produce better content, ideas and insights for you… every time!
How I Started Blogging
I started blogging over 15 years ago with Suburban Tourist, writing about travel, outdoor adventures and lifestyle topics.
In 2017, I rebranded it as a lifestyle blog. My focus changed as I figured out what I wanted to write about and who I wanted to reach.
Having started and grown several blogs, and with a background in marketing and public relations, I became a blog coach in 2020. Since then, I’ve been sharing what I’ve learned here on MargaretBourne.com, helping new bloggers through some of the challenges that I faced with Suburban Tourist.
So, I’m sharing my guide for starting a blog — particularly for one that’s ready to be monetized, so you can start your blogging journey with a solid foundation.

1. Choose Your Blog Niche, Know Your Reader, And Set A Launch Goal
Learning how to start a blog begins with an important first step: choosing a blog niche that’s right for you. You will need to do some research and think about your “why”.
Here are some initial questions to ask yourself as you’re starting a blog:
- What niche blog categories are showing long-term demand? Use tools like Google Trends, Pinterest Trends, Quora, Reddit and social media to spot demand before you create a blog.
- What is my expertise? Which topics am I most passionate about and knowledgeable enough to write about consistently?
- Who is my audience? What posts will interest them? What problems do they need help with? Take time to brainstorm their pain points.
- What type of content will I create? Will your blog include tutorials, personal stories or something else?
- Will my niche blog evolve with my life? If your life may change soon, such as marriage, kids or career shifts, consider how your blog niche can grow with you. If not, broaden it slightly to keep your blog growing and sustainable.
This is how you start building your blog’s brand identity when you start a blog. This will become extremely important in how your site visitors perceive you, and whether they will come back for more.
NOTE: While focusing on a niche makes it easier to position yourself as an expert since you’re focused on one core topic, what about writing on more than one? Let’s say you want to start a blog in the lifestyle category and you enjoy writing on family, food and home organization tips. Think about what core problem connects the three topics: busy parents who need help with quick solutions.
| RELATED: Best Lifestyle Blog Niches For Beginners
Determine Your Target Audience
Once you’ve chosen your niche, think about the person most likely to read your blog. The best way to get to know your target audience is to consider three questions:
- What are they trying to do or figure out? (Key problems they face?)
- What makes that difficult for them?
- What experience can I share that would help them take the next step?
For example, let’s look at that busy parent we’ve identified for the example of a lifestyle blog. They may already have plenty of recipes. What they need at 5 p.m. is a dinner they can make in 20 minutes with what’s in the fridge. Discovering this reader challenge gives you a better idea of what to write for them.
Do not skip this step! I made the mistake of not determining my blog audience for my Suburban Tourist blog. For a few years in the beginning, I was blogging on topics that were disjointed, limiting me from growing my following.
Set Your Launch Date
The final step when you start your blog is to set an official blog launch date.
Be realistic. Your launch date will change, particularly if you are starting a new blog as a beginner. There is a learning curve with WordPress and blogging skills. There are also several steps to take before your blog is ready to be launched.
Give yourself at least 4 to 5 weeks from planning to launching your blog.
PRO TIP: Stuck figuring out your niche? As a blog coach, I help many new bloggers determine this through a strategy session. It’s a guided exercise that helps you finally get clarity so you can move forward with starting a blog.

Choose Your Niche Wisely
PRO TIP: Based on experience, general lifestyle blogs tend to fail over time. It’s much harder to be profitable with a general lifestyle blog.
| RELATED: How To Choose The Perfect Food Blog Niche
How To Choose Your Travel Blog Niche
Struggling To Define Your Niche?
Let’s work together: a strategy blog coaching session can help you clarify your niche and your “Why”. Start your blog confidently! Learn about blog coaching sessions.
2. Choose Your Blog Name and Check Domain Availability
When you’re starting a blog completely from scratch, it can be tricky to choose the right blog name and domain URL.
I like to create a shortlist of potential names before checking whether the domain is available. Having a short list is a smart idea because if one of your blog names or preferred domains is taken, you have others to choose from.
Think about what will make the name easy for a reader to remember:
- Keep it short and easy to spell. Say it out loud to see if it sounds uncomplicated.
- Avoid hyphens and numbers. You’ll have to explain it every time you share the name.
- Consider using your own name. This works if you plan to offer services or build a personal brand.
- Give yourself room to grow. Will the name still fit if the topics you cover change?
Check Google search results to see if anybody else is using your chosen name.
When considering your blog name, it’s worth thinking ahead. Once readers know you by a particular name, it takes work to build awareness for the name change when you rebrand your blog.
Check Your Blog Name Before You Buy The Domain
Your domain name is your blog’s web address. Before you purchase it, I recommend three quick checks:
- Do a Google search for your shortlisted name and similar spellings to see whether another blog or business already uses it.
- Check for similar trademarks in the countries where you plan to do business. For the US, you can search the USPTO trademark database.
- Check that the domain and the social handles you want are available. I use Namecheap for a quick domain search.
Once you’ve decided the blog name, you can register the domain when you purchase hosting in the next step.
You can also register it separately through Namecheap or Network Solutions. One key reason you would want to go with this route is that your domain can stay with the same registrar if you switch hosting providers later.
| READ MORE: How To Choose A Blog Name That Works Perfectly For Your Niche
3. Choose Your Hosting And Set Up WordPress
When you’ve chosen your blog name, your next step is to give your blog a home. There are three things you need to know as you start a self-hosted blog:
- Your domain is the address readers type into their browser.
- A hosting plan gives you the server space to store your website.
- WordPress is the content management system (CMS) where you’ll write your posts and manage your blog.
Why I Am Recommending A Self-Hosted WordPress For A New Blog
If you’re starting a lifestyle blog, a business blog, or one you’d eventually like to monetize, I recommend self-hosted WordPress. Here’s what I like about it:
- Choose your theme. You can pick your own theme out of thousands of available themes. Change your layout as your blog grows.
- Plugin flexibility. You can use plugins to manage SEO, back up your site, and connect tools like your email marketing platform.
- Monetization freedom. You can choose how to earn from your blog, whether that’s through affiliate links, ads, or selling your own products and services.
- Improved Integration. It’s easier to integrate third-party platforms with your WordPress website.
- Professional look. Self-hosted blogs project more credibility.
- Scalability. As your audience grows, you’re not boxed into the limitations of a free blogging platform, or one that’s got its own ecosystem (like Showit, Wix or Squarespace).
NOTE: When you purchase hosting for a self-hosted WordPress site, you don’t need to buy a separate WordPress.com plan.
Why You Need A Quality Web Hosting Provider
As a beginner blogger, you need a hosting provider that is fast, secure and reliable. Good technical support is also important, as you will need help as you learn how WordPress works on the backend.
When I decided to start a blog, I chose a Canadian hosting provider that turned out to be… not great. The server performance was poor, and the customer support was even worse. My webmaster friend suggested a popular (and at the time, affordable) alternative, so I switched. While the migration was smooth, the quality and uptime have declined in recent years.
In 2024, I decided to move this site to NameHero – an independent, quality hosting provider. It’s been one of my best decisions.
I’ll walk you through purchasing hosting with NameHero below. However, if you want to compare providers first, BigScoots is another option I recommend. Lyrical Host is great for beginners if you’re located in the UK/Europe.
Before you choose a host, look beyond the advertised monthly price and check:
- How much you’ll pay upfront and when the plan renews
- What the renewal will cost once the introductory offer ends
- Whether SSL and backups are included, and how you’d restore your site
- How to reach technical support if your blog goes offline
Here’s why I strongly recommend NameHero to create your blog:
- Excellent reputation for fast servers, strong uptime (99.9%) and responsive support
- Independently owned, which often means better care, quality and long-term stability
- Extremely fast LightSpeed servers
- Generous bandwidth and storage
- Free SSL certificate included
- Free domain with 2-year+ Turbo (recommended) or Business packages (for extensions like .com or .net)
- Very reliable customer service
- Generous first-time discounts and affordable pricing afterward
- 30-day money-back guarantee
Remember: When you start blogging, your hosting provider affects everything: your site speed, SEO, security and your overall blogging experience. Investing in quality hosting from the start can save you stress, and it supports your long-term growth as you learn how to start a blog the right way.
Set Up Your Blog Using NameHero Hosting
Ready to start your blog setup? I’ll walk you through purchasing WordPress hosting from NameHero and getting into your WordPress dashboard for the first time. Have your preferred domain name handy. If you already own a domain you’d like to use, you can connect it to your new hosting account.
Here’s what you’ll do:
- Choose a WordPress hosting plan that works with your budget
- Register a new domain or select the option to use one you already own
- Check the billing term, renewal price, and optional extras before completing your purchase
- Follow the domain verification instructions if prompted and check that your blog opens at its
https://address - Log in to your WordPress dashboard

Choosing The Right Hosting Package For Your Blog
As you begin the process of reviewing the hosting packages on NameHero, begin by asking yourself these two questions:
- How many websites do you plan to create and run?
- How much are you willing to pay upfront?
Which NameHero hosting package should you choose? Here are details that can help you decide:
- If you’re launching one blog, the Starter plan covers one WordPress site and includes SSL and daily backups.
- If you’re planning to launch more than one blog, consider the Plus package. It supports multiple sites and gives you room to run both under one hosting account.
- If you’re bringing an existing audience to your blog or expect to run several sites, I’d look at Turbo. It includes 75 GB of storage, and NameHero lists it for around 50,000 visits per month.
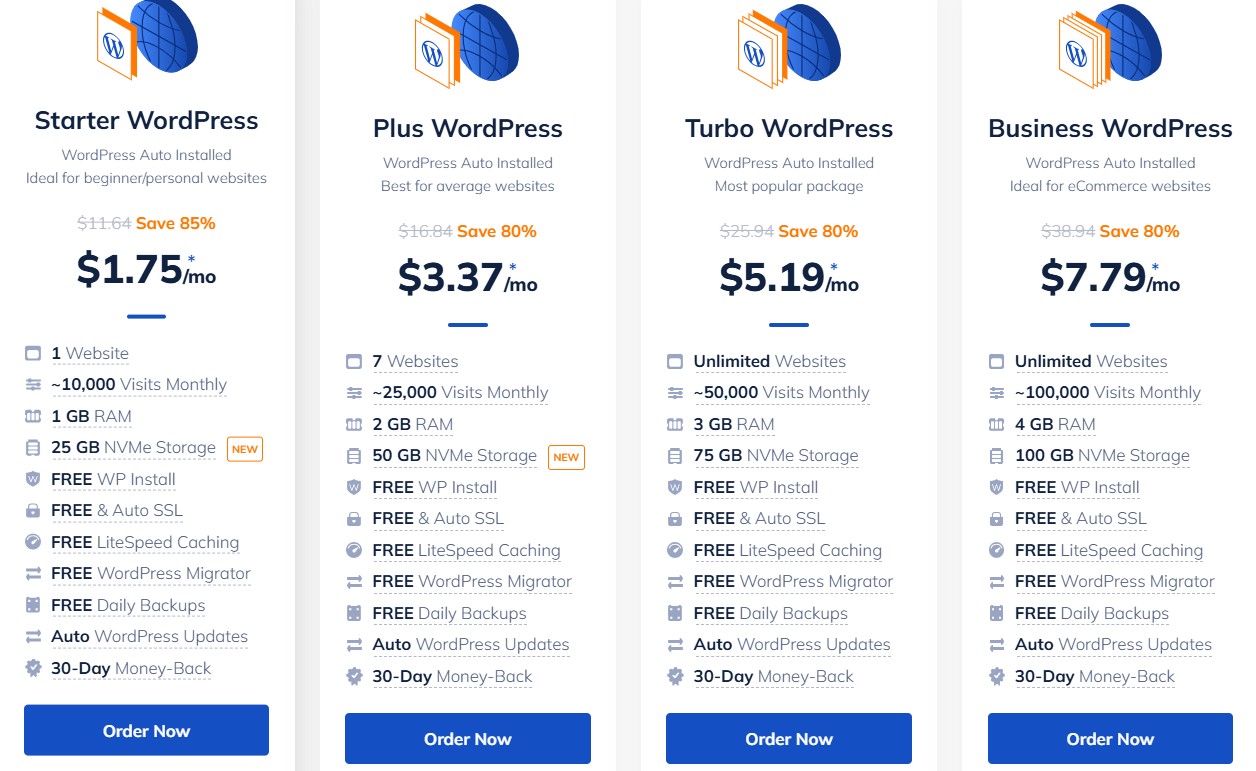
My Tip: Check the total for the full billing term before you choose. NameHero’s advertised three-year discount applies to the first invoice. Compare what you’ll pay today with what you’ll pay at renewal, especially if you’re working with a set launch budget.
Once you’ve chosen your plan, the next step is to register your blog’s domain name or connect one you already own.
PRO TIP: A 36-month term can save more money. In many cases, hosting can be written off as a business expense on your taxes.
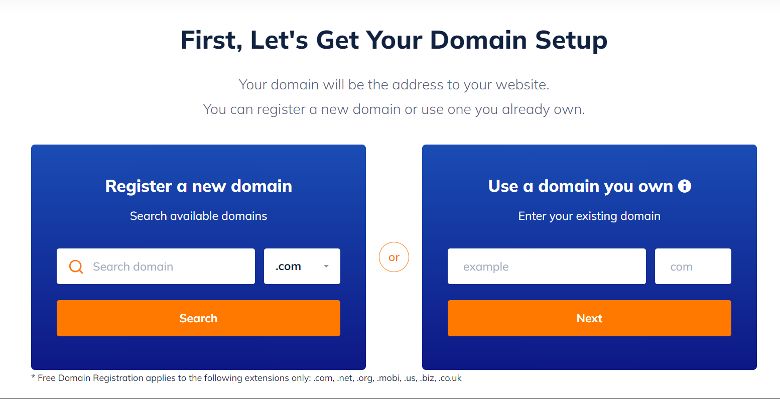
Register A Domain Name For Your Blog
Remember the blog names you shortlisted earlier? Now’s the time to choose your domain.
At this point, you’ll have chosen your hosting plan. With this next step in starting a blog, you have two options:
- Registering a new domain. Enter your preferred name and extension, such as .com, to check if it’s available. Double-check the spelling.
- Adding your existing domain. Choose the option to use an existing domain. After checkout, NameHero gives you instructions on how to connect it to your new hosting account.
Here’s a bonus: if you choose a NameHero Turbo or Business WordPress hosting plan for 24 or 36 months, an eligible domain such as .com or .net is included for the first year. After that, the domain renews at its regular price.
My Tip: Check the domain renewal price before you finish your order. Your hosting can be paid up for three years. But your domain will most likely require renewal after the first year.
Purchasing A Hosting Package For Your Blog: Key Steps
At this point in your starting a blog journey, you’ve chosen your hosting plan and domain name. Now you’re ready to review your order.
Before you enter your payment details, take a moment to check what you’re paying for.
- Confirm the hosting plan, billing term, and total due today
- Check the domain spelling and make sure any first-year offer appears in your order
- Review the extra options and remove any you don’t want
- Create your hosting account with an email address you already use and a strong, unique password
- Complete your purchase and save the confirmation email with your account details
The backup service is an important part of the package. NameHero’s WordPress plans include daily backups. However, before you pay for additional coverage, check how far back you can restore your site. Understand what the upgrade would give you.
Backups are important because if something breaks, your hosting provider can help restore your site to an earlier version.
While backups like these via your hosting provider are helpful, I also recommend keeping a separate backup somewhere you control. If your site breaks, you’ll want a recent copy you can access even if you can’t log in to WordPress.
Once WordPress is set up, follow my guide on how to back up your WordPress blog.
Confirm Your WordPress Installation And Verify Your Domain
Once you’ve purchased your hosting, check your inbox for your NameHero welcome email.
The good news is that WordPress comes preinstalled with NameHero’s WordPress hosting plans. When you log into your hosting account, check that your new site is ready.
What happens next depends on where you’ve registered your domain.
- If you registered a new domain: Look for a verification email from your domain registrar and follow the instructions to confirm your contact details.
- If you already own your domain: Follow NameHero’s instructions to point it to your new hosting account. If you already use that domain for email, check with NameHero’s customer support before changing its settings. You’ll need to set it up properly to keep it working.
Here’s something important to know: once you point your domain to your new hosting account, your blog may appear within minutes or a few hours.
Give it 24 to 48 hours for the change to reach different networks. During that time, you might see your new blog on your mobile phone while your home Wi-Fi still shows a placeholder page. This is completely normal and is called DNS propagation.
To check your site, open a private window in your browser. Enter your blog’s address, starting with https://. What you should be looking for is a WordPress page that loads without a security warning. Your website might have a default theme or sample post. You’ll customize that later.
If your browser shows a security warning, ask NameHero’s support team to check that your SSL certificate is active for your domain. They helped me get mine set up when I moved my site.
REMINDER NOTE: It can take a few minutes to several hours for the DNS to point your domain name to your new hosting server. Your hosting provider’s customer service tech rep should be able to help you with this. In the meantime, your job is to be patient! You can start drafting copy for your essential pages, like your About page, as you wait.
| Related: 10 Things To Do After Setting Up A Self-Hosted WordPress Site
Logging Into Your WordPress Dashboard
Logging into your WordPress site after it’s set up is easy. There are two key methods:
- Through your hosting provider’s site. Log in and use the WordPress login option for your website.
- Directly in the browser. Enter your website’s URL into your browser’s search bar and add/wp-admin to the end, before loading the page.
So something like this: https://yourdomain.com/wp-admin
This will take you to your login page, where you enter your username and password.
Once you’re in, look for Posts, Pages, and Settings in the menu on the left. Bookmark your dashboard so you can get back to it easily.
4. Configure Your WordPress Settings, Backups, And Essential Plugins
Once you’ve logged in to your new blog, head to Settings in the menu on the left side of your WordPress dashboard. This is where you’ll give your blog its title, decide what readers see on the homepage, and choose how your blog post links will look.
You can start here with this introductory video (although I provide some tips on settings below):
General Settings
For this, head over to the dashboard on the left-hand side and click on Settings.
You’ll see something similar to this:
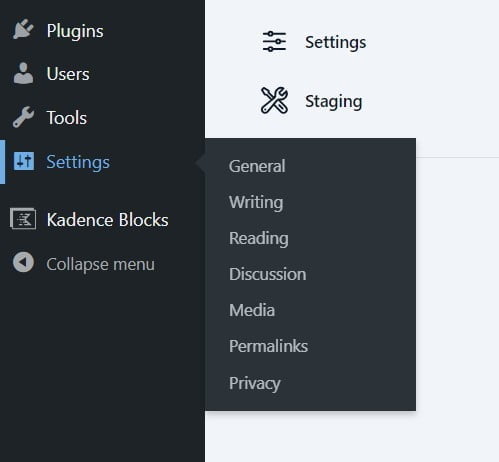
- Enter your blog name as the Site Title and add a tagline if you’d like one
- Check that the Administration Email Address is an inbox you use regularly
- Choose your site language and set your time zone so scheduled posts go live when you expect
No need to touch anything else.
Reading Settings
- Under Your homepage displays, choose what you’d like readers to see when they visit your blog. Your latest posts works well if you want your newest content front and centre. If you prefer a custom homepage, create separate Home and Blog pages, then select A static page and assign each one. You can revisit this when you set up your theme.
- If you select Discourage search engines from indexing this site while you’re building, add a reminder to uncheck it in Step 10 when you launch.
Leave the rest as is.
Discussion Settings
Make sure that “Before a comment appears” has “Comment author must have a previously approved comment” toggled. This will make it easier to automatically have pre-approved commenters’ comments appear.
Permalink Settings
A permalink is the web address for an individual post or page. Choose the “Postname” option, as this is the best for SEO, keeping your URLs short.
Click Save Changes on each settings screen you update.
These are important steps when starting a blog. If you don’t make some of these adjustments to WordPress in the beginning, you may have a couple of issues (like with permalinks) later on.

How To Update Your User Profile In WordPress
When you’re in the WordPress dashboard, go under “Users” and click Profile to add your name and details.
Under Display name publicly as, choose the name you want readers to see on your posts. You can also add a short bio if your theme displays an author box.
If you’d like your photo to appear beside your bio, you can set one up using the same email address as your WordPress profile through Gravatar.
This is useful if your theme has an author highlight for each post (usually at the bottom) and pulls it directly from Gravatar.
Which WordPress Plugins Do You Need To Start A Blog?
Your host may have already added several plugins. Check these first.
You may already have backups or caching included in your plan. For example, NameHero comes with the LiteSpeed caching plugin (not recommended).
These are the five free WordPress plugins I recommend looking at when you start a blog, depending on what you need.
- Back up your blog with UpdraftPlus. The free version is OK. I like having a copy I can access separately from my hosting account. Schedule backups of both your WordPress files and database, and choose somewhere to store them, such as Google Drive or Dropbox. Run your first backup. Check that it completed before you start customizing your theme.
- Set up on-page SEO with Rank Math SEO. The free version of the plugin lets you edit SEO titles and descriptions and create a sitemap. You’ll use that sitemap when you connect your blog to Google Search Console in Step 7. NOTE: If you have Yoast SEO installed already, deactivate and delete it.
- Protect your WordPress login with Wordfence (free version). One feature I’d set up early is two-factor authentication for your administrator account. Save your recovery codes somewhere you can access if you lose your phone.
- Filter comment spam with Antispam Bee (free). This is handy if you plan to allow comments on your blog. If comments are turned off, you can skip it.
- Add tracking code with WPCode (free). I use it to add code to the site header without editing theme files (so they don’t accidentally break). You can wait until Step 7 to install it if you choose this method for Google Analytics.
My Recommended Pick For A Paid Caching Plugin
A caching plugin serves a saved version of a page to visitors. This helps your blog load faster. Check which caching tool your host already provides before choosing one.
I tried LiteSpeed Cache and found the settings confusing. For my own blog, I use WP Rocket, which I find easier to set up and manage.
5. Choose and set up a WordPress Theme
The next step in starting a blog is choosing a WordPress theme. In most cases, your hosting provider will have it set to WordPress’s free theme.
However, it’s best to consider one that:
- Works with your blogging needs (business/non-business blog)
- Fits your niche and brand
- Attracts your reading audience
For example, feminine WordPress business and blog themes are great if your audience is primarily women. Check WordPress theme demos to see how they look both on your desktop and your phone.
It’s good to start with simple themes first and upgrade to Premium ones later. You can easily purchase a new theme from sites such as:
- Restored316: Feminine child themes for the ultra-fast Kadence theme. This website uses one of their themes.
- 17th Avenue: Feminine child themes for the Kadence theme, feminine for bloggers, creatives and solopreneurs.
- Bluchic: Feminine Elementor-based business and blogging themes.
- Kadence – This is your best free option with a super light WordPress theme with many template options. You can customize with the premium version.

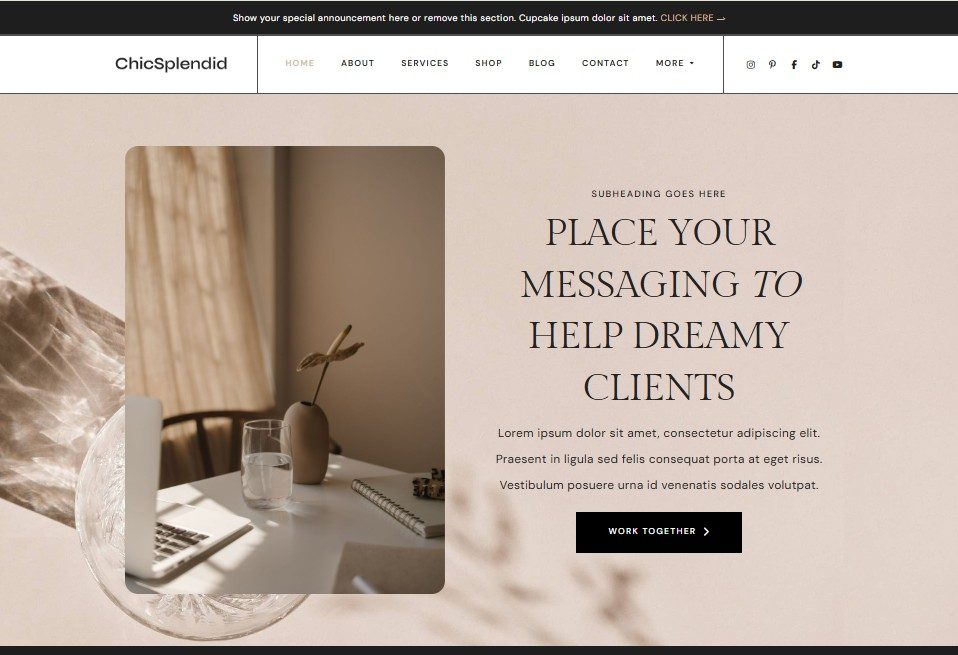
Take into consideration the reviews on any theme, the instructions for setting it up and what you can do with it.
Sometimes it’s easier to have a simpler blog theme that’s easy to set up than a complicated one.
NOTE: Kadence Blocks and Elementor are page-building plugins that require a bit of learning. However, they offer you lots of customization and flexibility to create a site design that works for your needs.
How To Install A WordPress Theme
In your WordPress dashboard, go to Appearance and then Themes and select the option to add a new theme. Your next step depends on where you got it:
- For a free theme like Kadence, search for it by name, click Install, then Activate.
- For a purchased theme, follow the developer’s setup guide. If it’s a child theme, install the required parent theme first. Then select Upload Theme, choose the child theme’s ZIP file, install it, and activate the child theme.

Need Help Figuring Out WordPress?
Let’s work together to get your website set up. Learn the essentials and start blogging confidently.
Add Your Blog Branding
When you start a blog, one of the things you’ll need to do is brand your site so people know what it’s all about.
This means you need to :
- Design and create a logo, as well as the favicon (the little image you see on tabs in an Internet browser)
- Create a brand look and feel – decide on fonts, colour palettes, link format and the overall look of the blog
- Determine image styles, motifs and aesthetic
Start with the details that people will see on every page. Test what they look like on both your desktop and mobile phone.
This is the most fun part of starting a blog, but don’t dwell on it if your visuals aren’t perfect. This can always be adjusted later.

Get the Blog Branding Toolkit: Canva-based template to organize your blog brand palette and brand guidelines.
6. Create Your About, Contact and Key Legal Pages
The next stage in starting a blog is setting up the essential key website pages.
About Page
The About page answers two key questions: “Is this blog for me?” and “Who’s behind it?” Start this page with who you write for and what they’ll find on your blog. Then introduce yourself and share the experience that connects you to your topic.
I like to include a photo or two. If you’re stuck wondering what to write, here’s how to write an About Me page for your blog.
Contact Page
The contact page gives readers an easy way to connect with you. Keep the content short and to the point: a short invitation and either an email address or a contact form is all that’s needed.
If you use a form, a name, email address, and message are enough to get started.
Add your About and Contact pages to your main menu.
PRO TIP: Check to see if your contact form works. Once you’ve set up your blog email in Step 7, send yourself a message from your phone and reply to it. That quick check tells you a reader can reach you and hear back.
Set Up Essential Legal Pages For Your Blog
When starting a blog, you need to factor in some budget for legal protections. Every blog requires three key legal pages on the site. They’re usually found in the footer section.
Legal pages protect you and your website legally and financially. You also need these legal pages before you start monetizing with affiliate links, ads or even brand collaborations.
These three key legal pages are:
- Privacy Policy. This tells visitors how you protect their private information gleaned from their visits to your site, sign-ups to your newsletter, etc. This is important for compliance with GDPR and CCPA.
- Disclaimer. Be clear about what visitors can and can’t do with the information on your site, and identify how you work with affiliate programs and third-party links.
- Terms & Conditions. This is the agreement between you and your site visitor as to what they can do with your information. Essentially, your blog’s rules regarding your content.
You need all three to legally protect yourself and your blog from costly potential lawsuits.
To make it easier for you to create these legal pages, I highly recommend the easily customizable starter Legal Bundle from Amira at A Self Guru. She’s a blogger AND a lawyer and has created a super-easy, up-to-date legal bundle including all three key legal pages and 6 extras that keep you uber-protected.
When I added these legal pages to my blog, I could sleep easy knowing that I was protecting my website and myself from potential lawsuits.
NOTE: This template bundle works in the US, Canada and internationally. Amira sends updates when there are essential changes.
PRO TIP: You’ll also want to make sure your site is accessible to those with disabilities. Check out Amira’s checklist, guide and accessibility statement (like the one I have in my footer), and plugin recommendations in her ADA Compliance package. Don’t get sued for not being ADA-compliant
7. Set Up Your Email Address and Connect To Google Services
We’re past the halfway mark of this guide on how to start blogging. Right now, you still have a few tweaks to make on the backend as you’re starting a blog from scratch.
You’ve got your Contact page set up, so now it’s time to set up your email address. It’s also time to connect your site to Google Analytics and Google Search Console. Let’s
How To Set Up A Professional Domain-Based Email
Using your website’s domain name, you’re going to create a professional email address such as admin@yourblogname.com. It not only helps you look like a professional blogger, but it is also needed for email marketing platforms, among other things.
If you’re working with NameHero, you can get the details on how to set up with Outlook or Gmail. Some hosting providers include email. Create your mailbox in your hosting account and sign in through webmail.
Now it’s time to test your Contact page form. Send a message through your Contact page using a different email address. Check that it arrives in your blog inbox, and reply. This test catches issues that you can troubleshoot.

Connect Google Analytics
Google Analytics gives you insights into where your site visitors are coming from and how much traffic your site and specific posts are getting.
When starting a blog, don’t skip this step!
If you’re using Google Analytics, here’s how to connect it:
- Create a Google Analytics 4 property for your blog and add a web data stream using your blog’s full https:// address.
- Check whether your theme or another plugin already adds the Google tag. If you’re setting it up with WPCode, copy the full tag from Google’s installation instructions into WPCode’s site-wide Header field and save.
- Open your blog in a private browser window, accept analytics cookies if prompted, and visit a couple of pages. Look for your test visit in the Realtime report. NOTE: It will take about a day or so before you start seeing full day stats.
If you’ve set up a cookie consent banner, check that it handles your Analytics tag according to the visitor’s choice.
PRO TIP: A fantastic alternative to Google Analytics is Fathom Analytics. Read my Fathom Analytics review to learn why I’ve switched and continue to invest in this easy-to-use, ethical analytics tool.
Verify Google Search Console
Google Search Console is a useful SEO tool that shows you which keyword searches bring up your posts in Google. You find out which pages get clicks, and whether Google reports indexing issues.
It’s worth setting up even if you use Fathom or another analytics tool.
Head over to Google Search Console and click Start Now. You will see options to add your website.
- Add your blog as a URL-prefix property using its exact address, including https:// and www if your site uses it.
- Choose HTML tag as your verification method. Copy the tag into WPCode’s (free plugin) Header field. It can be added below any code you’ve already added. Save it.
- Open Google Search Console and click Verify. Leave the tag in your Header after verification.
- Submit your sitemap. If you’re using the RankMath plugin for SEO, find your sitemap address under its Sitemap section. Check that the sitemap URL opens. Once your blog is public in Step 10, head over to Google Search Console and submit that address under Sitemaps.
If you have a Coming Soon page, it will prevent Google from seeing the verification tag. Finish verification when you make the site live.

8. Create A Topic Cluster And Write Your First Blog Post And Publish It
You’re doing great on your starting a blog journey. It’s time to write your first blog. It’s time to learn about creating blog content that readers will love. We’ll start first with categories and topic clusters, and then look at tips for writing your first blog post.
How To Choose Blog Categories and Create Topic Clusters
As you learn how to start blogging, you will need to organize your topics and determine categories.
When you start a blog, it’s easy to fall into the trap of writing on any topic that you like. But if your posts don’t fall into your chosen categories or are off-niche, then they shouldn’t be published.
Create a blog site structure strategy. This will help you write blog posts and create an organized website. It’s also good for search engine optimization and site visitor experiences.
Here’s how to do this before you start writing your first blog posts:
- Narrow down your topic categories to about 3 to start. These categories should be broad enough to have more than one topic cluster.
- Choose one of the categories. Brainstorm and research 5 to 10 popular topics for this category, including one key cornerstone blog post (a general topic post for that category).
- Decide on three of the topic cluster posts to write on first. Select the topics that you feel most comfortable writing about. Each of them should have a key question/concern that they address.
Start Writing Your First Blog Post
This is a milestone moment as you start your blog. Out of those three blog posts, choose the first one you’ll write.
- Conduct keyword research. Choose one main keyword phrase to use naturally throughout your post.
- Create a blog post outline. Draft your blog post introduction, body and conclusion. Remember to include a couple of external links to reputable sources. If you can, interlink your blog posts if they are on related topics.
- Prepare and add your images. Choose and edit your images, then optimize them so they’re smaller, fast-loading files. Always optimize your blog post images, reducing image size and saving them as smaller files using tools such as Pixlr.com (a very affordable online image editor). You can also use TinyPNG. I save mine as JPGs at 70% quality for small sizes that load fast.
- Save the draft and then publish! Once you’re happy with your blog post content and formatting, hit Publish.
For your “official” blog launch, I recommend having about 3 posts published. This will keep your first site visitors checking out your content.
Try to use on-page search engine optimization (SEO) best practices from the start. You will learn SEO over time and can always update and tweak your blog post optimization later.
FREE TEMPLATE: Get my free blog post template to help you get started on your first blog post.
| RELATED:
How To Write A Great Blog Post Your Readers Will Love Reading
Why You Should Never Steal Content From Other Blogs
Start Blogging Confidently!
Get one-on-one coaching that teaches you how to find the best topics, do SEO correctly and write impressive blog posts that delight your readers!
9. Test Your Blog On Your Phone And Computer
Before launching your blog, test it by using it as a reader would.
Start on your phone. Open the homepage, find your first blog post, and see how easily you can read it and get back to the menu. Click through features in the menu and the footer. Do they all work correctly?
Then try the same thing on your computer.
Here’s what I recommend checking:
- Click your logo to make sure it takes you back to the homepage
- Open your menu to click through to your About page, Contact page, and blog posts
- Read your first post on your phone. Check that the text is easy to read and the images fit the screen.
- Follow the links in the post, including any buttons or downloads
- Send a message through your Contact page and confirm it reaches your blog inbox
- Check your footer links and remove any sample text, empty categories, or social icons that lead nowhere
Have somebody who’s never seen your blog take a look at it on their desktop computer and phone. A fresh pair of eyes can show you where a reader might potentially have issues.
10. Launch Your Blog
You’ve got your new blog set up and a few posts ready to be published. Your next step to starting a blog is to actually launch it!
There are two ways you can do this:
- Do a soft launch, where it’s live, and you’re making tweaks before your official launch.
- Celebrate with an official launch, but continue to make changes in the first few months.
How To Soft Launch A Blog
Soft launching a blog means you make it go live, letting both site visitors read your content and search engines crawl it.
The benefit of a soft launch is that Google and search engines can index it, even as you make final tweaks.
It may take a few days to a few weeks before your blog and posts begin to show up in searches. Don’t be disappointed if it’s not showing up. You may need to submit your sitemap in Google Search Console first (see Step 7) to get your blog found properly by Google.
Once you’re ready, you can do an official launch on social media.
How To Officially Launch Your Blog
Starting a blog is a reason to celebrate. When you’re ready to tell everybody about your new blog, promote it:
- Announce it on your personal Facebook profile. Your family and friends are more likely to be your greatest supporters and repeat site visitors.
- Share the news in Facebook groups for bloggers. If you’ve joined one of the many Facebook blogger groups and are permitted to share your news in a daily thread or on the main feed, this is the perfect time to do it.
- Post on your blog’s social media accounts. Announce to your followers that you’ve officially launched your blog.
- Add it to LinkedIn. If you want to showcase your content marketing and digital marketing skills, you can announce it to your professional network.

Congratulations – you’ve gone through the journey of starting a blog, and now the adventure begins!
| RELATED: Over 100 Business Hashtags For Instagram To Promote Your Blog and Online Business
Blog Planning And Content Calendars: Get Organized
Before we wrap up this post about how to start a blog, I strongly recommend your next step is to get organized content-wise. It’s good to keep your momentum going as you build your content foundation and for SEO.
Your AI chatbot like ChatGPT or Claude can be very helpful with this next step. However, if you need help with some blog post ideas check out these:
Read my tips on how to create a blog content calendar, using several different types of blog posts, and useful tools to keep you on track.

Need Expert Help? Time To Work With A Blog Coach!
Hey – it’s Margaret here. I’m a blog coach, working with new bloggers like you, helping them launch and grow their blogs. Learn more about my blog coaching services.
FAQ About How To Start A Blog
How Much Does It Cost To Start A Blog?
A self-hosted WordPress blog has two basic costs: hosting and a domain name. WordPress itself is free, and you can launch with a free theme and plugins. To work out your starting budget, check the total for your hosting that’s due at checkout. An advertised monthly rate may require paying for several years upfront, and a domain included for the first year can renew separately.
How Do I Choose A Blog Niche And Name?
Select a topic you know well, are passionate about and can write many posts related to it. Once you know your focus, choose a blog name that’s easy to say and spell, then check for similar names and domain availability before you buy.
How Long Does It Take To Start A Blog And Launch It?
If you’re building your first WordPress blog around work or family, four weeks is one possible launch plan. You could spend the first week on your niche and name, the second on WordPress setup, the third on your key pages and first post, and the fourth on testing and launch. Give yourself extra time if you’re learning WordPress as you go.
How Many Blog Posts Should I Publish Before Launch?
Launch with at least one useful post that answers a question your reader cares about. If you have time, ideally aim for three related posts so visitors who enjoy the first have somewhere to go next.
Can I Start A Blog And Make Money From Day One?
Yes, you can launch with a service to book or a product to buy. Earning money on day one depends on reaching someone who wants that offer, so income can take time even when everything is set up. If earning is one of your goals, start with a way to monetize that fits your readers.
Growing Your Blog: What’s Next
Once you start your blog, let’s look at some of the key skills and blogging activities for your first year:
WordPress Setup and Monthly Maintenance Guide
How Blogging Works: Myths Vs Realities
How To Get Started With Email Marketing
Pinterest Marketing For Bloggers: A Beginner’s Guide
How To Make Money With A New Blog – A Mini-Guide
Affiliate Marketing For Bloggers: Beginner’s Guide
Start Blogging Profitably
Get one-on-one blog coaching to build out a monetization strategy and plan that works for your niche and helps you achieve your goals. A roadmap to a dream online business!
Key Takeaways For Starting A Blog In 2027
So, do you have a good idea of how to start a blog? If you’re still stuck, seek support. Learning WordPress and how to set up your website can feel overwhelming at first. However, once you create a blog for the first time, any future blogs are easier.
Here’s a handy checklist of key things to do after you start a blog.
A few more useful posts to get you started:
20 New Blogger Tips and Insights To Help You Grow Faster
15 Blogging Habits Of Successful Bloggers
Once you’ve launched your blog, take my next course – Grow It: Build Your Blog Foundation to get started on creating content with intention, ready for growth and your next step: monetization!
Want A Checklist To Follow As You Start Your Blog?
My free Launch It: Start A Blog Course & Toolkit walks you through setting up WordPress, publishing your first post, and checking that your site is ready for readers. Get the launch checklist I use in the course to help you track tasks.
QUESTION: What are your questions about starting a blog?
Like this post? Share it on Pinterest! Thank you!
Originally published in 2018, updated for 2027.
Want more blogging advice from Margaret?
Add MargaretBourne.com as a Preferred Source so Google can highlight more of my blogging advice for you in Search, AI Overviews and AI Mode.


This is so full of useful information!
I’m glad you think so!
Wow, that information is great, and it is a great-looking website.
Thank you David!
This was very helpful! I currently have an e-commerce brand through Shopify and want to have a blog platform through WP and self host on Name Hero. I am confused on what to do for the domain name. I would like to sync Shopify and WP. I would like to use my current brand name as my blog name. So…here is where I am confused, what do I put as a domain name through Name Hero? Do I put “currentbrandname”BLOG.com? Thank you so much!
You won’t be able to use the same domain name as you have for your Shopify shop, unless you decide to close the Shopify account down. Then your domain is essentially released to be used elsewhere. What you can do is find a domain that has the name but a different suffix – so funlearngrowco .blog would work. or as you have it funlearngrowblog .com would work. In your new blog’s navigation, you could add a link to your Shopify shop. 🙂
Would you recommend a sponsored content contract? And should I have a media kit prior to starting sponsored posts? I’ve always wondered what the standard is for bloggers.
Yes to both. With the sponsored contract, it’s usually to ensure that the brand pays you. Sometimes the brand has a contract already that they use with influencers. Just make sure that their terms are fair. If it’s a smaller brand that doesn’t have one in place, always ask them to sign yours. As for the media kit, PR & brand managers love to see these as they are a snapshot of what you do and can do for them. It’s like a portfolio of your work in a one or two page doc they can skim through.
Such a great comprehensive resource for new bloggers!
This is such great information and very detailed. I will be going back through the information to help improve our blogging site. Thanks for sharing!
This is great information all new bloggers need! Even seasoned bloggers can learn a few new things as well! Thanks for sharing!
These are some great tips for new bloggers! Even as someone who has been blogging for two years, I find resources like these so valuable! Thank you for sharing!
Amazing tips. Read the whole thing and will definitely be trying out some new plug ins on my blog. Thank you!!
This is such a helpful post – thank you so much for sharing Margaret!
You’re most welcome! I hope it’s helpful to you.
Hey I just wanted to know if I’m making my blog,is it necessary to purchase domain name or spend money on things if you make a money making blog .please help
Hi Areeba, when you purchase your domain name, and you’re self-hosting, you have more control over your blog. If you’re using WordPress as your blogging platform, you can add plugins and app integrations with Woo Commerce and others that help you with money-making activities (such as selling your own digital products or physical products). Without your own domain name and a self-hosted site, you’re limited in what you can do with free blogging services. Your own domain also makes you look more professional.
You are most welcome!
I am just starting to monetize my blog, but haven’t tried Adsense. Can you customize the ads to make them relevant to your blog niche?
Not 100% sure – will look into this for you. My understanding is that you can customize the types of ads that appear.
I am working on monetizing my blog right now. I haven’t tried Adsense. Can you customize it to show certain ads, or a certain niche of ads?
This is a great post! So informative! You have listed every step a new blogger needs to set up a money making blog!
I’m glad to hear that it’s got informative content!
These are great tips! I just started my blog a month ago and I have already learned so much! Thanks for the great article it will help me in the future for sure!
That’s great! Look forward to seeing your blog grow.
This was so amazing to read, I am currently at the point trying to really take my blog to the next level so this was so needed to read.
I love this one and I will share this with a friend who’s starting her blog!